Customize the terminal
I love the terminal. Besides the fact it makes you look awesome while using it, it can also do about a gazillion different things. Most of them useful.
One thing is for sure, while developing webapps I have it running all the time and spend a lot of time running commands and monitoring output. So why not make it look as pretty as it is awesome? In this short walkthrough I'll explain how to customize the terminal to make it look like mine, but make sure you fiddle with the settings so it works best for you.
What we will be making
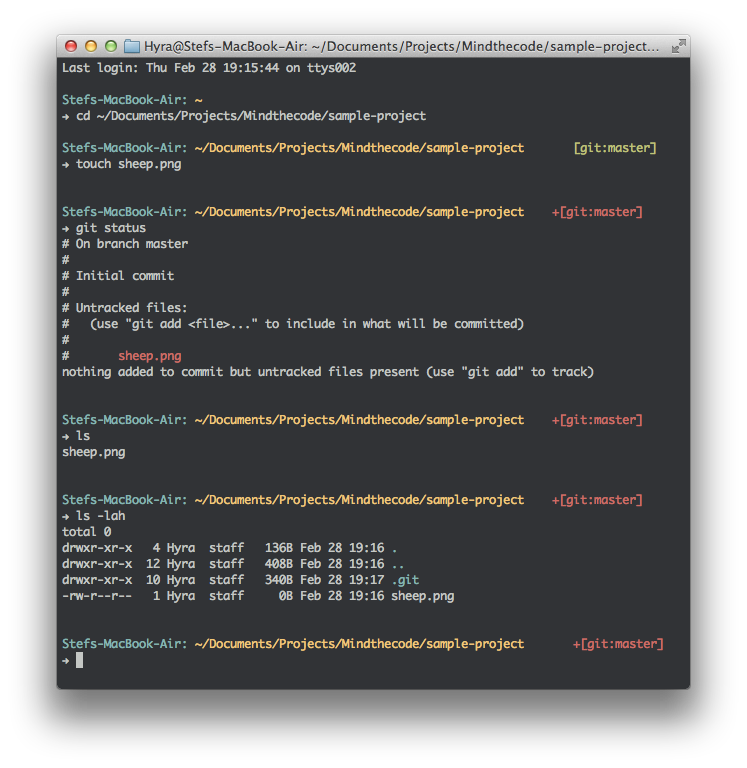
Below is a screenshot of what my terminal looks like:
That's right, besides the beautiful colour-scheme it also visually tells you what git branch you're in and information about its status.
The ingredients
So, let's get to it. We will be needing a few things to set up the basis, and will then start fiddling with settings.
Colour theme
The theme I'm using is Tomorrow Night. I use it for my every day coding, so it made sense to propagate those colours into the terminal. Chris Kempson did an amazing job at making this theme available for pretty much everything out there, so grab the Terminal version here.
Download this file and put it in a folder that makes sense.
Once you've done that, simply double click the file and it will open a terminal window with the new theme active. Next go to Preferences by hitting Command-.
In the Settings tab you will see a list of themes, including your fresh Tomorrow Night one. Make sure to make it the Default one.
Font
Choosing a font is the most important thing, because, if you're anything like me, you spend a hell of a lot of time looking at it. For the last 4 months I've been using Monaco 12pt. Make sure to select the font you like to work with in the Theme Settings.
ZSH
I recently got to know oh-my-zsh, which as Robby describes it, is:
"A handful of functions, auto-complete helpers, and stuff that makes you shout.. 'OH MY ZSHELL!'
To get it working you first have to change the shell you're working in. By default OSX users get the /bin/bash shell. ZSH is pretty much the same, but comes with quite a few handy additions to make it cool enough to use. To change your shell to zsh simply go:
- System Preferences
- Users & Groups
- Right click your user account and select
Advanced Options(You might have to click the little lock first) - Change
/bin/bash/to/bin/zshin the Login Shell dropdown - Save your changes
Next, to get oh-my-zsh working, they have provided a nice one-line install script which you run, of course, in the terminal:
curl -L <https://github.com/robbyrussell/oh-my-zsh/raw/master/tools/install.sh> | sh
Preparing the ZSH theme
We're almost there! Next up is creating a theme for zsh to get the prompt to work and look the way we want. Oh My ZSH was installed into ~/.oh-my-zsh so open up that folder. You will see it has a lot of themes ready. What we want to look at first though is the zshrc.zsh-template file in the templates folder. If you've ever did any terminal customisation you might be familiar with a file called .bashrc. This is pretty much the same thing, but for .. you guessed it: zsh
So open up that zshrc.zsh-template file and find the line that says ZSH_THEME="robbyrussell"
We will create our own theme so replace the theme name with your own theme name. For instance: ZSH_THEME="sheeptheme".
Save this file as ~/.zshrc. Go to the themes folder again, and create a new file called sheeptheme.zsh-theme, or whatever title you gave your theme.
Creating your custom ZSH theme
Now the fun part. Making it all yours. Open up the theme file you created, and put the following inside:
function git_prompt_info() { ref=$(git symbolic-ref HEAD 2> /dev/null) || return echo "$(parse_git_dirty)$ZSH_THEME_GIT_PROMPT_PREFIX$(current_branch)$ZSH_THEME_GIT_PROMPT_SUFFIX" }

function get_pwd() { print -D $PWD }

function put_spacing() { local git=$(git_prompt_info) if [ ${#git} != 0 ]; then ((git=${#git} - 10)) else git=0 fi

local termwidth (( termwidth = ${COLUMNS} - 3 - ${#HOST} - ${#$(get_pwd)} - ${bat} - ${git} ))

local spacing="" for i in {1..$termwidth}; do spacing="${spacing} " done echo $spacing }

function precmd() { print -rP ' $fg[cyan]%m: $fg[yellow]$(get_pwd)$(put_spacing)$(git_prompt_info)' }

PROMPT='%{$reset_color%} '

ZSH_THEME_GIT_PROMPT_PREFIX="[git:" ZSH_THEME_GIT_PROMPT_SUFFIX="]$reset_color" ZSH_THEME_GIT_PROMPT_DIRTY="$fg[red]+" ZSH_THEME_GIT_PROMPT_CLEAN="$fg[green]"
The above will probably be pretty self-explanatory, we got a function to get the Git information from the current folder, so we can determin if it's dirty. A function to get the current directory. And a function to determin how much space to put between the first part of the prompt and the last part (the git part) so that it aligns nicely.
Extending even more
You will probably find it doesn't exactly fit your exact needs, and I would encourage you to fiddle with it as long and as much until you are happy with it. You can find a lot of nice plugins in the /.oh-my-zsh directory to play around with, so please do.
Conslusion
A good prompt comes down to personal preference. I hope you can make yours look the way you want and that the above was a good starting point to get there.
Happy CLI-ing!


