Exploring the wonderous world of image processing
I've always been intrigued by image processing. Especially by programs that can actually detect objects in images. However, I've never done anything serious with this except for the odd API calls to various Cloud based services like Google Vision, Watson or Clarifai.
I always wanted to toy around with a library that makes these services tick, such as OpenCV, but it requires installing some OS specific tools and the whole thing always feels daunting so I never really got anywhere with this. But today we'll explore this together, so I'm sure we'll be fine 👀.
Disclaimer
This won't be a clear cut walkthrough / tutorial. Rather, it's going to take you along with my thought process and trial and error journey. We might create something awesome, or we might fail miserably! Nah, we'll succeed in the end. I hope.
What will we be building?
Obviously, the possibilities with image processing are spectaculary endless, so we need to set some sort of goal of what we want to achieve. I was sparked to look into OpenCV again through a recent post of someone who replicated a system that can detect license plates in images, but he didn't explain how he did it, so let's figure that out.
The program in its simplest form should:
- Take an image as input source
- Detect if there is a license plate in the image
- Update the image with a text-overlay showing the license plate it found
What will we need
My go-to tool for writing a program, as usual, is Node, so that's quickly sorted. As for what we need to process images, I'm guessing we need OpenCV, and lastly, we will need some sort of library that can detect license plates.
A quick google search for nodejs detect license plate hints to OpenALPR, which seems to do exactly (and much more) what we want, so let's explore ..
Pro tip: Rather than building things completely from scratch, always do a google search for what you want to do.
Taking OpenALPR for a spin
Taking a look at the docs of the "OpenSource Automatic License Plate Recognition" library it seems we will need to compile it for our specific OS, and will give us a CLI tool. Not exactly what we want, but as it also says it has bindings for NodeJS I'm sure we can work out how to call this from our app once we get there.
As I'm on OSX, I'll be following the steps described here to install it with Homebrew. FYI: this took forever on my Macbook 😴.
brew tap homebrew/science
brew install openalpr
brew install --HEAD openalpr
With the above installed, let's see if it works. I created a directory on my ~/Desktop
mkdir ~/Desktop/alpr-try
cd ~/Desktop/alpt-try
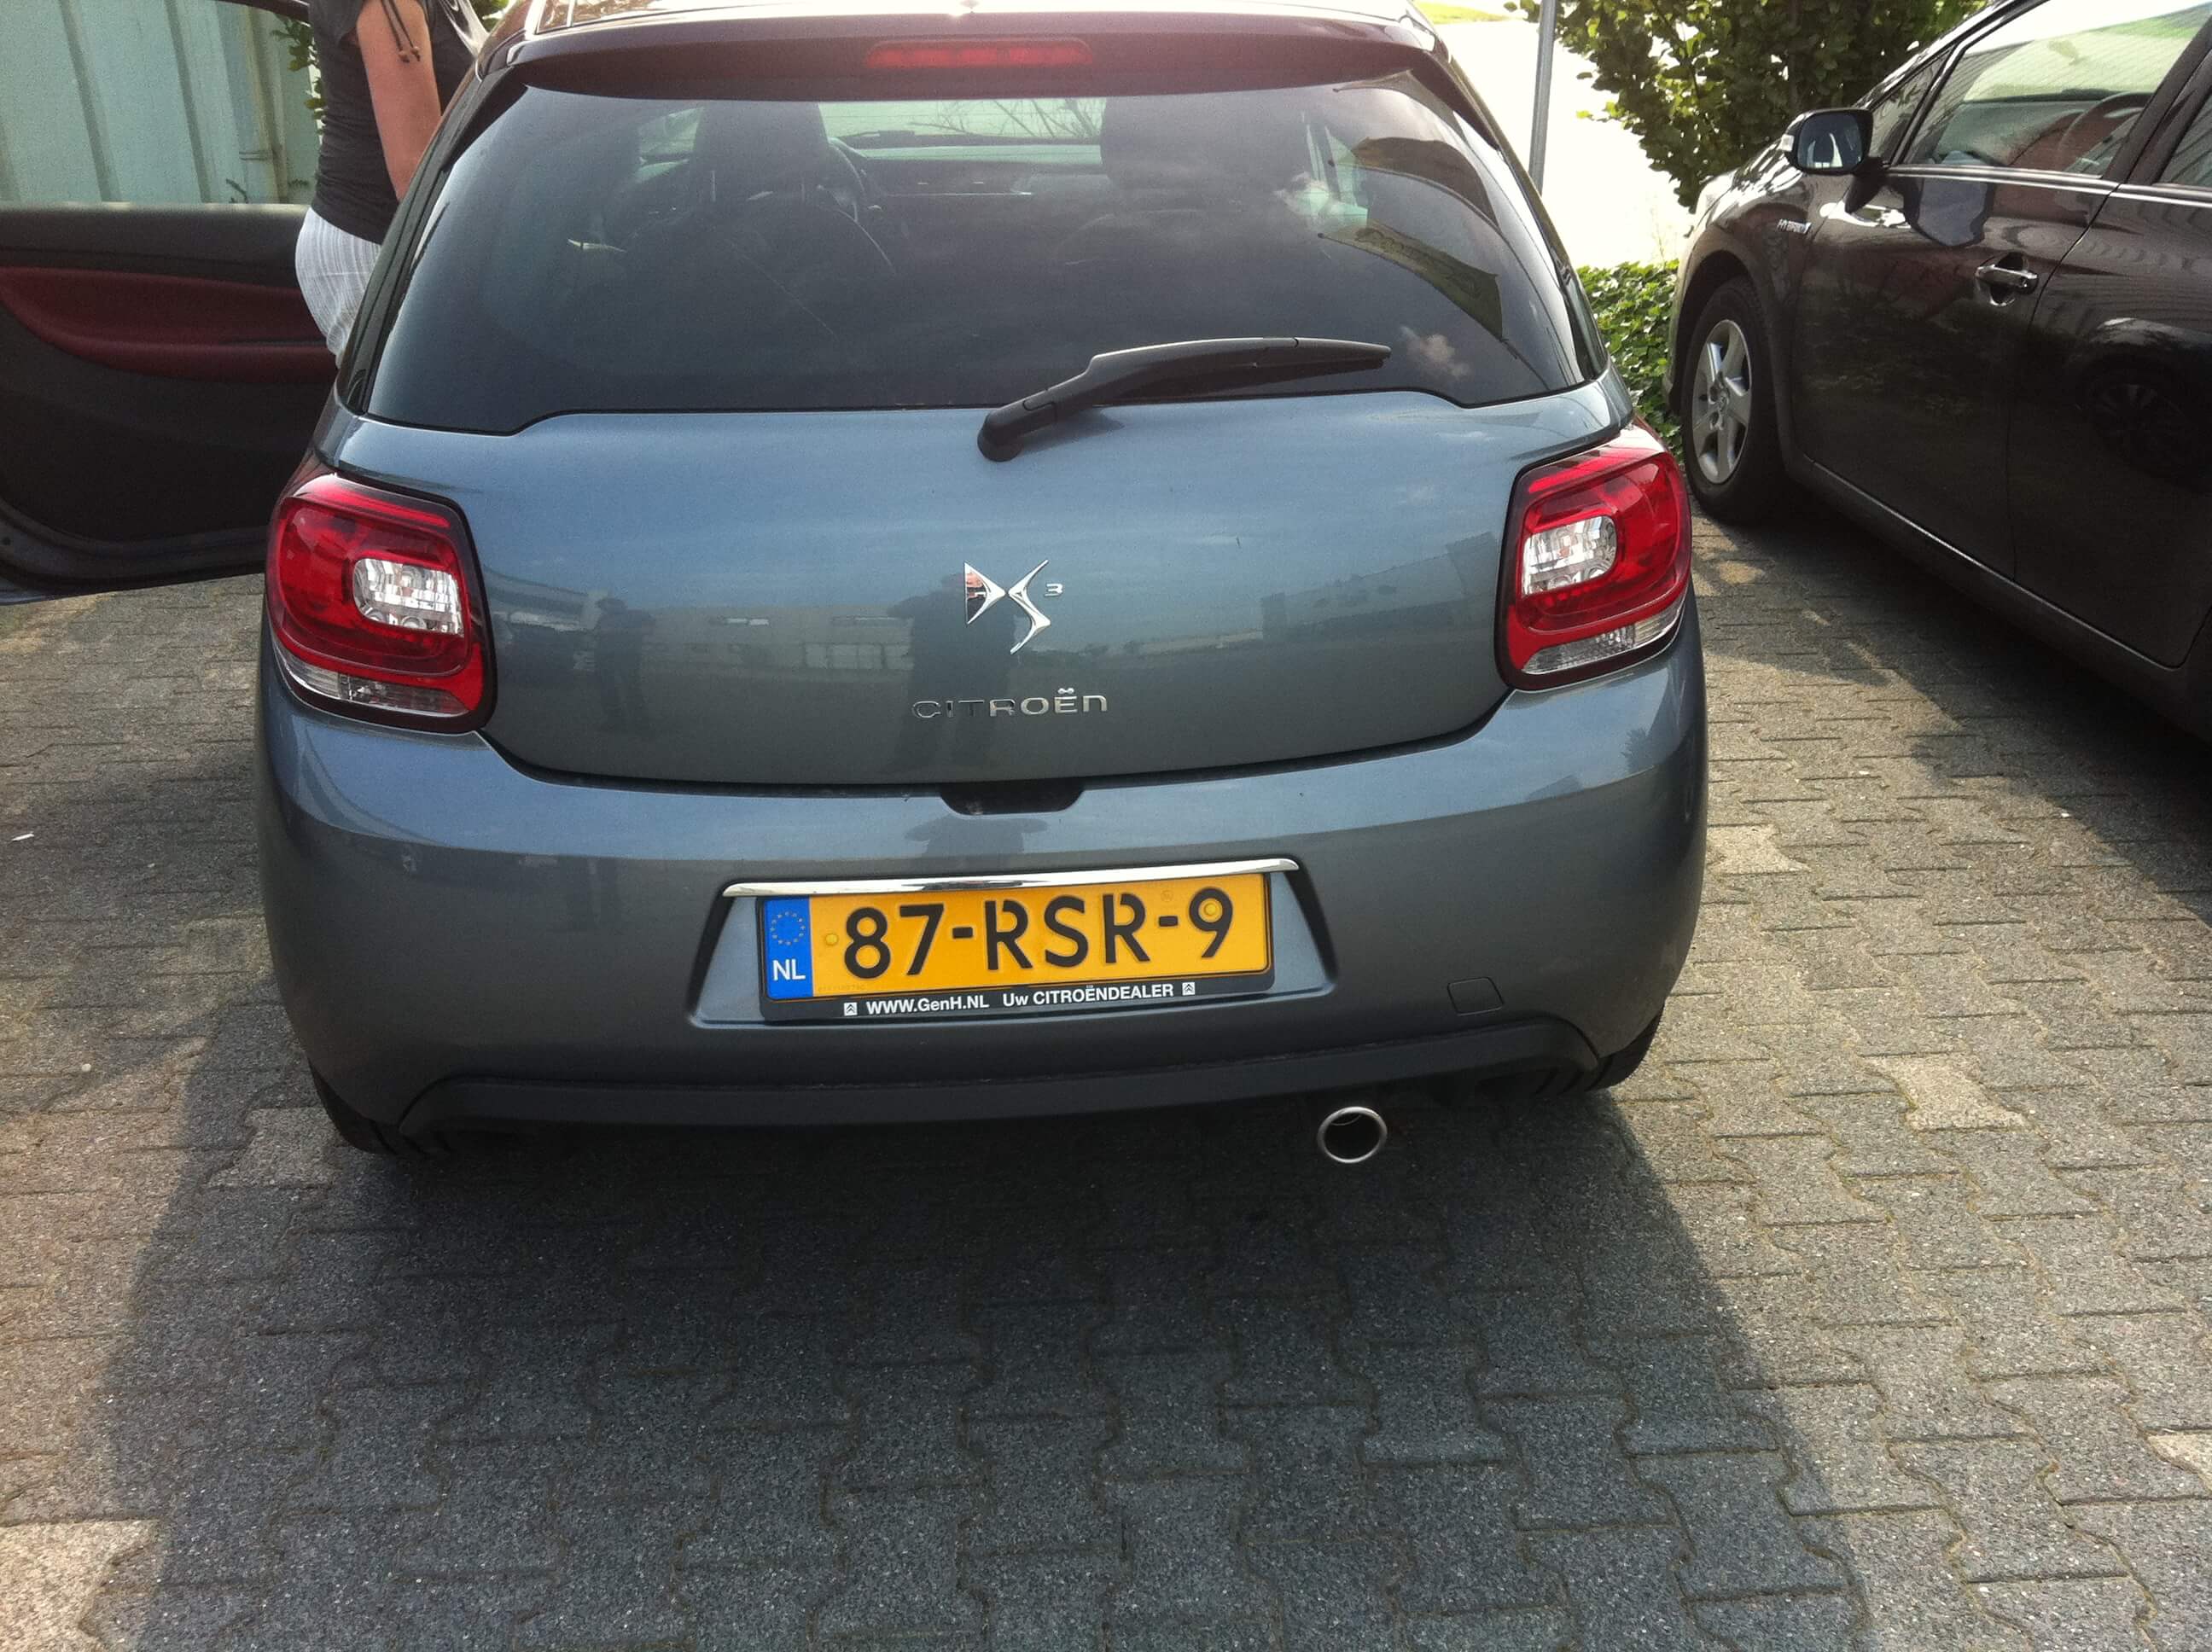
Next, we most likely need an image to test, I googled this one and saved it in the same folder as alpr_sample.jpg:

So if all goes well we should be able to call the library and get some output!
alpr alpr_sample.jpg
So, in my case it came back with No license plates found.
Interesting.
I figured it could be because it's a Dutch license plate, so I tried a different image, and also added the options -c eu to specify the 'country', but it still wouldn't detect any plate properly. I then tried running the image through their online demo and there it worked perfectly 🤔
So of course, I tried looking up if there were others that were suffering the same issues. I figured it could be the dutch training data, but eventually, I came across this issue which is exactly what I'm experiencing but with a different picture:

However, when I run that exact same image through alpr myself it gives me the following output:
❯ alpr -c eu alpr_sample2.jpg
plate0: 4 results
    - 87RSR9     confidence: 92.8769
    - 87R5R9     confidence: 81.6913
    - B7RSR9     confidence: 78.5817
    - B7R5R9     confidence: 67.3961
That looks like it's working perfectly 🤷 ..
I went onto a website where you can sell your car and tried a few different images. The alpr engine was able to detect the plates most of the times, but it seems the quality of the picture needs to be rather high, and the license plate must be in view pretty much head on for it to work properly.
That's okay though, I'm sure there's some treshold-like settings we could tweak, but at least we know that it's able to detect our plates. That will do for now.
Taking the next step
Now, with just the alpr command line tool we pretty much have 80% of what we want already. It takes an image as argument and finds the plate information which it returns as a list of possible matches along with a confidence percentage. But we want to update the image with an overlay showing what we detected. So we're not done .. yet!
To be able to take an image and draw onto it we'll probably use imagemagick or gd, but first we need to figure out how to get some output from alpr that we can work with. Preferably we receive the output as json so we can parse it with javascript and determin the data we want to overlay on the image.
Looking at alpr --help it turns out there's an option --json to have the result output as .. JSON. It kind of feels too easy and set up, but really, most libraries offer some sort of output modifier, and JSON is a common format, so we're just going to go ahead and be grateful for the library to follow mass convention.
So. Looking at the JSON output we can see there's a .. hold on, let me tell you about a nifty tool called jsonpp. You install it with homebrew:
brew install jsonpp
And then you can pretty print any JSON output in your terminal, like so:
alpr -c eu alpr_sample2.jpg -j | json_pp
This makes looking at the JSON output a lot easier on the eyes:
{
  "regions_of_interest": [],
  "img_width": 2592,
  "results": [
    {
      "region_confidence": 0,
      "requested_topn": 10,
      "plate_index": 0,
      "plate": "87RSR9",
      "processing_time_ms": 17.959999,
      "region": "",
      "confidence": 92.876862,
      "coordinates": [
        {
          "x": 879,
          "y": 1054
        },
        {
          "x": 1486,
          "y": 1019
        },
        {
          "x": 1495,
          "y": 1134
        },
        {
          "x": 888,
          "y": 1171
        }
      ],
      "candidates": [
        {
          "confidence": 92.876862,
          "matches_template": 0,
          "plate": "87RSR9"
        },
        {
          "plate": "87R5R9",
          "matches_template": 0,
          "confidence": 81.691261
        },
        {
          "matches_template": 0,
          "plate": "B7RSR9",
          "confidence": 78.581734
        },
        {
          "matches_template": 0,
          "plate": "B7R5R9",
          "confidence": 67.396126
        }
      ],
      "matches_template": 0
    }
  ],
  "epoch_time": 1506364279842,
  "processing_time_ms": 578.179993,
  "img_height": 1936,
  "data_type": "alpr_results",
  "version": 2
}
So, where were we ..
Looking at the JSON output we can see there's a results node, which is an array of "plates found", with an array of coordinates (clearly a box of where the plate is in the image), and a candidates list of 'guesses' per found plate which has a confidence percentage and the license plate as a string. We can also see there's a conficende level at the result level, but by the looks of it that's just the highest level of confidence found in candidates array.
So, what we can do is look at the confidence level, and if it's higher than 90% (arbitrary, but 90% seems a likely hit) we can take the first element of the candidates list and use its plate attribute for our overlay image,
Getting the output in our app
So far we've been using the CLI version of alpr to test images, but if we want to do something with that output we should call the library from inside our node app. To get this going we need to install an npm package of some sort. A quick google search hints us to node-openalpr which looks like it would do the job, so let's give it a go.
npm install node-openalpr
Next, let's create a file called detect.js in which we will write some code
var openalpr = require("node-openalpr");

var path = "alpr_sample2.jpg";

openalpr.Start();
openalpr.GetVersion();

openalpr.IdentifyLicense(path, function (error, output) {
  console.log("error", error);
  console.log("output", output);
});
According to the example the above should be enough to get us going. I'm not sure why we have to explicity call Start and GetVersion on the library, but hey. I usually just console log both response arguments in the callback, just to see wether we get an error and what response we get to work with.
Running the above gives us the following:
❯ node detect.js
error null
output { version: 2,
  data_type: 'alpr_results',
  epoch_time: 1506403454835,
  img_width: 2592,
  img_height: 1936,
  processing_time_ms: 767.252014,
  regions_of_interest: [],
  results:
   [ { plate: '387R',
       confidence: 88.487923,
       matches_template: 0,
       plate_index: 0,
       region: '',
       region_confidence: 0,
       processing_time_ms: 28.799,
       requested_topn: 10,
       coordinates: [Object],
       candidates: [Object] } ] }
Not bad, looks like it works. However, the plate should read 87RSR9 and not 387R. But, we already know this is probably because we need to pass in the country parameter somehow. Looking at the docs there doesn't seem to be a way to do this however. In this case, I like to go to the Issues page and check if anyone else already wondered about this. Usually you're not the first to solve a problem :)
So according to this issue, it seems we will need the Sneko/node-openalpr fork, which provides options like region. Now, to install a specific github repository as NPM module we need to specify it like so:
npm install git+ssh://git@github.com/Sneko/node-openalpr.git
After that, we can modify our code so that it takes the region parameter in the Start method:
- openalpr.Start()
+ openalpr.Start(null, null, null, true, 'eu')
Now when we run the script again, we get the result we're after:
❯ node detect.js
error null
output { version: 2,
  data_type: 'alpr_results',
  epoch_time: 1506413177206,
  img_width: 2592,
  img_height: 1936,
  processing_time_ms: 639.130005,
  regions_of_interest: [],
  results:
   [ { plate: '87RSR9',
       confidence: 92.876862,
       matches_template: 0,
       plate_index: 0,
       region: '',
       region_confidence: 0,
       processing_time_ms: 35.858002,
       requested_topn: 10,
       coordinates: [Object],
       candidates: [Object] } ] }
Creating an image
Next up, we'll want to create an image. We can use the original image as the base, then lay a box on top of it with the license plate we found as text. Let's see if GD has something we can use. Googling for nodejs gd gives us various options. One of them is easy-gd but looking through the README it doesn't offer an easy way to write text on top of an image. Another result is node-gd, but that one seems to lack text options as well 🤔
Googling a little bit more specific for nodejs gd text layer gives up another node-gd, but when we look for 'text' in that repository we actually get some example code. Perfect!
Installing it can be done like so:
$ brew install pkg-config gd
$ npm install node-gd
Let's first see if we can create an image with a bit of text, before trying to incorporate it in our detect script. This keeps things nice and clear so we don't have to juggle everything at once. Create a file image.js and add some code. This is pretty much the node-gd example code, but modified a bit so we can show a license plate. Please note we apparently need to specify a font file for the text, so I used Frank Bold so grab that if you don't have a .ttf handy.
// Require the node-gd library
var gd = require("node-gd");

// Create blank image in memory of 300x100 (which will be the license plate holder)
var img = gd.createSync(300, 100);

// Set background color to black
img.colorAllocate(0, 0, 0);

// Set text color to white
var txtColor = img.colorAllocate(255, 255, 255);

// Set full path to font file
var fontPath = "./frank-bold.ttf";

// Render string in image
img.stringFT(txtColor, fontPath, 24, 0, 10, 60, "AABB123");

// Write image buffer to disk
img.savePng("output.png", 1, function (err) {
  if (err) {
    throw err;
  }
});

// Destroy image to clean memory
img.destroy();
For me, running the above gave me some errors about libjeg. Things are never just easy and straight forward, are they 😩 But hey, that's part of developing. Anyway, googling for a bit I stumbled upon this comment on an issue on Github, which fixed it for me:
wget -c http://www.ijg.org/files/jpegsrc.v8d.tar.gz
tar xzf jpegsrc.v8d.tar.gz
cd jpeg-8d
./configure
make
cp ./.libs/libjpeg.8.dylib /usr/local/opt/jpeg/lib
Now when I run node image.js I actually end up with an image:

Cool.
So let's integrate the 2 scripts we have. Let's grab the original image (the photo of the car and license plate), create an in-memory image with the found license plate data as text, merge the two, and write it out as output.png. I created a file scan.js for this:
// Open ALPR library
var openalpr = require("node-openalpr");

// Node-GD library
var gd = require("node-gd");

// Image with plate to scan
var path = "alpr_sample2.jpg";

// Initialize openalpr with EU as country
openalpr.Start(null, null, null, true, "eu");
openalpr.GetVersion();

openalpr.IdentifyLicense(path, function (error, output) {
  // We assume we find one, we should of course have some more checks going here
  var licensePlate = output.results[0].plate;

  // Create an overlay image
  var img = gd.createSync(300, 100);

  // Set the background color to black
  img.colorAllocate(0, 0, 0);

  // Set the text color to white
  var txtColor = img.colorAllocate(255, 255, 255);

  // Load the Frank Bold font
  var fontPath = "./frank-bold.ttf";

  // Write it onto the image
  img.stringFT(txtColor, fontPath, 44, 0, 10, 60, licensePlate);

  // Save the image as output.png
  img.savePng("output.png", 1, function (err) {
    if (err) throw err;

    // Destroy the image (from memory)
    img.destroy();

    // Let's merge the 2 images we have

    // Base image
    var base = gd.createFromJpeg("alpr_sample2.jpg");

    // Our overlay image
    var overlay = gd.createFromPng("output.png");

    // Copy the overlay image on top of the base image
    overlay.copy(base, 20, 20, 0, 0, 300, 100);

    // Save the result
    base.savePng("output_combined.png", 0, function (err) {
      if (err) throw err;

      // Exit the program, else it will hang forever
      process.exit(0);
    });
  });
});
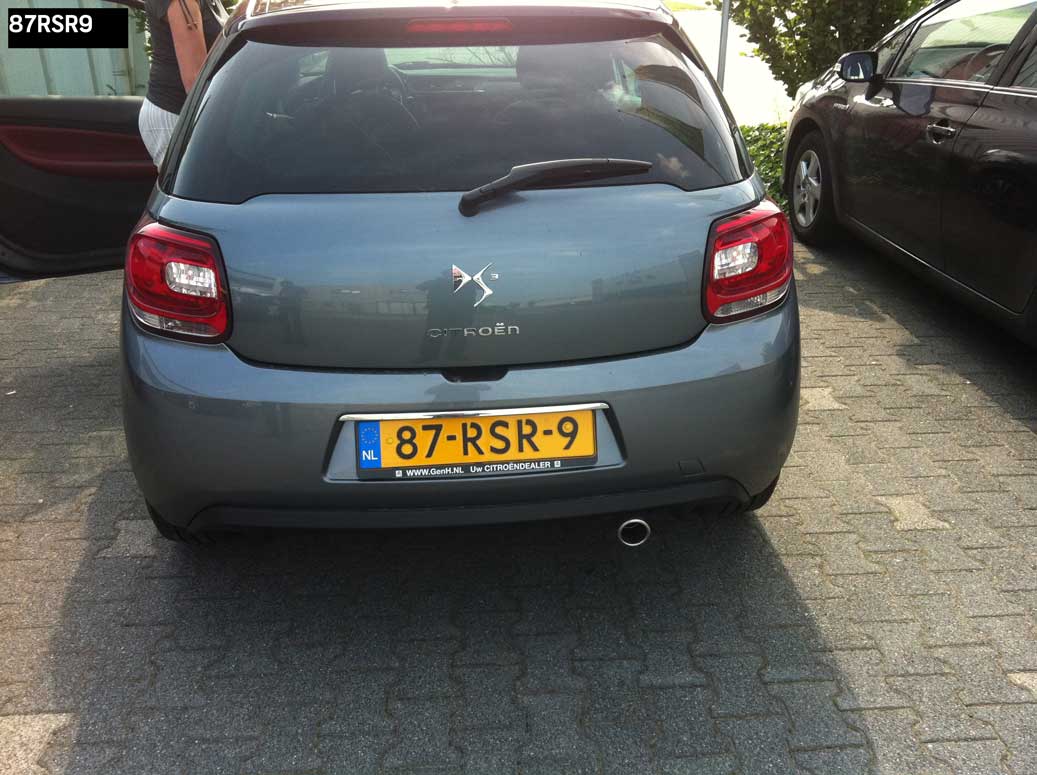
Now when we run this, we end up with our end result. The original image, with on top of it the license plate it detected

Let's see what our original goals were:
- Take an image as input source ✅
- Detect if there is a license plate in the image ✅
- Update the image with a text-overlay showing the license plate it found ✅
Looks like we're done!
Of course, this could be a lot more exciting, maybe by creating a webinterface where you drop a picture and it will tell you the license plate, but I'm sure you can work this out from here.
Hope this was of help to someone, happy coding!

